

How To Set Up An Arc Welder
Stick welding (SMAW or Shielded Metal Arc Welding) is one of the about popular welding processes along with MIG and TIG. It's a simple procedure that is pop with outdoor welders due to it not being affected by current of air – unlike MIG and TIG welding which uses gas cylinders. Our full guide will teach you lot the advantages and disadvantages of stick welding, how to fix for stick welding, stick welding processes and troubleshooting tips.
Contents
- What is Stick Welding (SMAW)?
- Advantages of Stick Welding
- Disadvantages of Stick Welding
- Getting Started – What You Need
- Safe Equipment
- Stick welder
- Footing Clamp
- Slag Removing Tools
- Choosing your Electrode
- Stick Welding Setup
- How to Lay your Beginning Stick Weld
- Striking the Arc
- Moving the Electrode
- Other Welding Positions
- Common Mistakes & Troubleshooting
- Lots of Spatter
- Porosity
- Undercut
- Thin Weld Bead
- Lumpy Weld Bead
- Trouble Starting Arc
- Final Thoughts
What is Stick Welding (SMAW)?
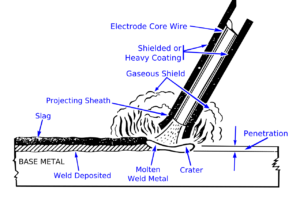
Stick welding is performed past striking an electric arc between a metal electrode and the work piece. An electric electric current passes through the electrode and melts information technology into the work piece and forms a weld pool. The electrode is covered in a layer of flux which melts and protects the weld pool from being contaminated by the atmosphere (in the same way a shielding gas protects it in MIG and TIG).
The flux forms a layer of slag to be formed on summit of the weld bead which will demand to be chipped off and brushed down in one case the weld is complete.
Advantages of Stick Welding
- Stick welding is portable. A small stick welder tin can perform on thick metal, isn't very heavy, and y'all don't require a wire feeder or any additional equipment similar a gas cylinder.
- Stick welding is the best selection for outdoor atmospheric condition. Welding with gas won't produce skilful results in windy conditions.
- Information technology is easier to master than TIG welding, only does require some skill.
- Y'all tin can weld on metallic with mill calibration or rust.
Disadvantages of Stick Welding
- It requires more skill than MIG as you need to proceed the electrode a sure altitude from the metallic as information technology burns down.
- It produces a lot more spatter and slag.
- Increased cleanup time results in decreased efficiency.
- The weld will not be every bit intricate or high quality as TIG.
Getting Started – What You Need
Prophylactic Equipment
When welding the most of import consideration is always your safety. You must read and follow all the safety data and instructions provided with the transmission for any equipment you use when stick welding.
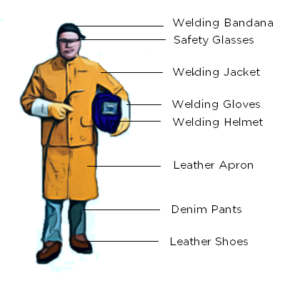
When welding you volition need body protection to protect from the heat and ultraviolet rays and sparks produced by the arc. Fire retardant long sleeved clothing will protect your body, and safety glasses and a welding helmet will protect your caput and eyes.
Welding should only be performed when at that place is adequate ventilation due to the fumes emitted . If you lot're outside in a breeze you'll be fine, but if you're indoors you need ventilation. An exhaust is the best way to remove fumes from the area.
Stick welder
You won't be able to practice whatsoever stick welding without a stick welder. You can either apply a multipurpose welder that volition let y'all perform more than ane type of welding, for example, MIG, TIG & Stick. Or you can apply a stick only welder, which is a lot cheaper.
There are a lot of welders on the market. You tin run across our full guide on choosing a stick welder for more than help on this.
Ground Clamp
Your ground clench will usually come with the welder. if should be plugged into the stick welder and clamped to the work slice.
Slag Removing Tools
Stick welding produces slag over your weld. For this reason yous'll need to clean upwards the weld afterward you've done it. You're best using a slag fleck and hammer to chip the slag away, and following this up past scrubbing with a wire brush.
Choosing your Electrode
In that location are hundreds of different types of stick electrode out there, and you'll need to choose the right one that matches your welding projection. The most pop are 6010, 6011, 6012, 6013, 7014, 7024 and 7018 (click hither for a comparison of 6010 vs 6011 vs 6013 vs 7018 vs 7024). When you lot're working on balmy steel, any E60 or E70 electrode volition exercise the job. 7018 are probably the most popular electrode of all these and produce really strong welds but 6013 are a good choice for beginners.
To sympathise which electrode to choose you lot need to sympathise what each of the 4 numbers mean.
- The first two digits show the minimum tensile force. For instance, a sixty,000 psi tensile forcefulness electrode will first with 60. This volition need to match the base metal strength properties.
- The tertiary digitindicates which positions the electrode tin be used when welding. Number one represents the ability to exist used in any position, whilst number 2 can only be used in flat position.
- The quaternary digit tells yous the current that you tin can use for the electrode, and the blanket on the electrode. We take a reference chart for that below.
| Digit | Type of Coating | Weld Current |
| 0 | Cellulose Sodium | dcep |
| 1 | Cellulose Potassium | ac, dcep, dcen |
| ii | Titania sodium | air conditioning, dcen |
| 3 | Titania potassium | air conditioning, dcep, dcen |
| 4 | Atomic number 26 Powder Titania | ac, dcep, dcen |
| 5 | Depression hydrogen sodium | dcep |
| 6 | Low hydrogen potassium | ac, dcep |
| 7 | Iron pulverisation iron oxide | ac, dcep |
| 8 | Iron pulverization low hydrogen | air conditioning, dcep, dcen |
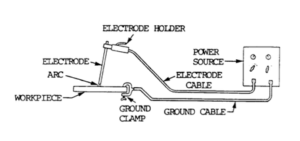
Stick Welding Setup
Stick welding is a fairly straightforward ready up that will look something like the image below. Remember that your polarity settings volition depend on the electrode yous're using so be certain to double bank check whether it's AC/DC-/DC+. To go started try some 6013 electrodes on DCEN on some 3/16 inch steel plate.
How to Lay your First Stick Weld
And so you've set everything up, now y'all're ready to lay a weld. Brand sure your settings are all correct and become a couple of pieces of scrap metal and place them downwards as a butt joint. Stick welding requires a chip of skill, and then information technology's always best to practise on some scrap metallic first before you jump in there and get-go trying to weld on an bodily project.
Hitting the Arc
Once the total electrode is in the electrode holder, plough on the welder. To strike the arc, identify the tip of the electrode onto the metal, and rapidly elevate it across as if you lot're hit a friction match. It the arc is formed, lift upwards the electrode very slightly and then you tin pull it besides the metallic. Of the electrode sticks to the metal, break information technology off by giving it a slight twist. If the arc cuts out, and then y'all have lifted up the electrode besides high from the surface and should have it lower. One time the arc is lit it should make a sound like frying bacon, if sounds loud and ambitious then y'all need to plow the amperage downwards.
Moving the Electrode
One you've lit the arc y'all should movement the electrode across the articulation to perform the weld. Before you move the electrode you lot need to take information technology at the right bending which is betwixt 15 and 30% to the vertical.
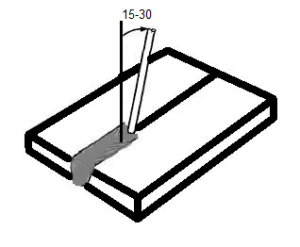
Once you have it at the correct angle you need to slowly pull the electrode dorsum towards yous. You can't push the electrode because the slag will get trapped in the weld pool and cause porosity. You'll need to keep a steady mitt so try resting your other elbow on the table and property your hand that's holding the electrode to steady it. Examination it out a few times and troubleshoot by using the troubleshooting section at the terminate of this mail service.
Other Welding Positions
If you lot fillet weld an upside downward T weld, you should conform the bending to about 35% up from horizontonal. This is because the weld will start to fall slightly due to the force of gravity if the bending is not adjusted to help push the bead support confronting the force of gravity.
The more slag that is created the larger angle you'll need. If your angle is also modest, the slag volition fall into your weld pool and cause weld defects.
Common Mistakes & Troubleshooting
When y'all start out stick welding information technology'south probable y'all'll brand some mistakes, even if you lot're experienced in MIG or TIG. The well-nigh mutual mistakes I see are having too long an arc, having the wrong drag angle, welding at the wrong speed and the incorrect temperature.
Lots of Spatter
In that location'southward lots of causes for getting too much spatter when you're welding, one of the most common is having the arc likewise long. You should concur the electrode only very slightly above the work piece, else the arc won't be able to focus and will jump around erratically instead of existence smooth.
If at that place's spatter and the arc lets out a loud screeching sound so you've probably got the amperage on too high and should plough it downwards.
Porosity
One of the principal causes of porosity in a stick weld is having the electrode at too steep an angle. If y'all don't keep the slag a the back of the weld pool past pulling the electrode back at an angle then the slag will mix into the puddle and crusade porosity.
Undercut
Undercut is having a piddling crater at the toe of the weld betwixt the weld and the metal plate, which makes the weld weaker. If you take undercut and the weld looks burnt out, try turning the amperage down because information technology's likewise hot.
Thin Weld Bead
The platonic stick weld bead will be roughly 2.5 times the diameter of the electrode. If the weld is actually narrow then it won't take sufficient penetration. Endeavor slowing downwardly by well-nigh half the speed that you were initially pulling the electrode and y'all should run into better results.
Lumpy Weld Bead
If you're pulling the electrode too slowly, the filler metallic volition pile upward will and be lumpy. Another cause is having the amperage too low which will limit penetration and cause the filler metal to just sit on top of the joint.
Trouble Starting Arc
If you take trouble starting the arc then it will be because it's likewise cold which is causing a weak arc. Try turning it up by 15 amps or so and see if it'southward any easier.
Concluding Thoughts
Nosotros hope yous liked our guide to stick welding, we'd really appreciate it if you lot could rate and share it.

How To Set Up An Arc Welder,
Source: https://www.kingsofwelding.com/guides/smaw-stick-welding-how-to/
Posted by: caudlebude1972.blogspot.com
0 Response to "How To Set Up An Arc Welder"
Post a Comment